Happy Holidays! We’re grateful for your support and wish you a joyful season.

Welcome to the PHDwin Download Website
Support is online M-F from 9:00 am - 5:00 pm (CDT).

Licensing PHDwin for Single Users & Concurrent Users

Getting Started with a PHDwin License

To use PHDwin software, you have two options: For Single-User/Standard installations:
  • Purchase and activate an activation code for each computer that will be running PHDwin.
  • The software can only be installed on the licensed computer.
For Concurrent-User/Network License:
  • Purchase and activate a concurrent-user license to use license server, which allows a specific number of users to access PHDwin from any computer on the same network.
  • The software can be installed on multiple computers, but only the licensed number of users can access it at the same time.
  • If your computer is running a Windows Server OS, you must use a network seat license as standard licenses are not supported.

Single-User / Standard Installation Guide

Single-user/Standard License definition:
Access to the software is limited to the computer on which the software is installed.

Step 1 – Request a New PHDwin License

    1. Open PHDwin to the splash screen/login window.
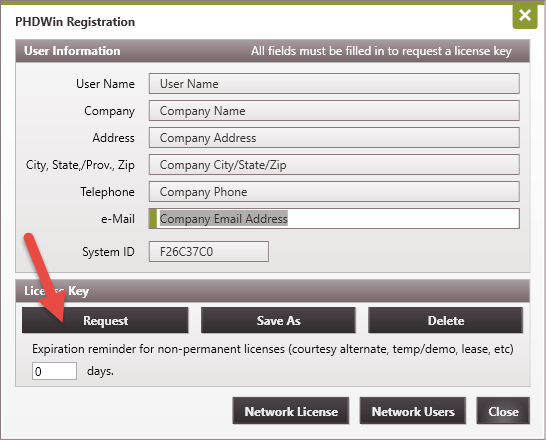
    2. Click on the Registration button – this will open a new window.
    3. Fill out the form completely – every field must be filled in to complete the request.
    4. Verify the System ID field has been populated – this is required before you send in your request.
    5. Email the request to the license team using one of the following options
    • Click the Request button. This will use your default email program to generate an email with the correct information pre-populated. You just need to send the email.
    • If your default mail program does not automatically generate an email, you will need to email the information in the registration to the license team. You can take a screenshot of the completed registration form by pressing Ctrl + PrintScreen OR you can type in the information including your name, company name, address, phone, email, and system ID. When you are finished, send the message to license@phdwin.com with the subject line “License Request for PHDwin Version 3”
V3 Splash Page with Registration Button Highlighted

Step 2 – Saving a License File

  1. Once the license team receives your email, they will process it and send you back a license file. Saving your License File:
    1. Open the email received from license@phdwin.com.
    2. Save the email attachment named PHDwin.lic to the C:/Program Files/TRC Consultants/PHDwin 3.1/Config folder.
    3. Open PHDwin to confirm that the license has been activated and registration was successful.
    If the steps above do not work, try saving the license string directly. To do so:
    1. Open the email received from license@phdwin.com.
    2. Open PHDwin. On the login window, click on Registration.
    3. Click on the Save As button and copy and paste the license string from the email into the Save As window.
    4. Click Apply and Close the registration window to confirm that the license has been activated and registration was successful.
    Note that if you encounter any issues during the licensing process, you can contact the PHDwin support team for assistance.

Concurrent-User / Network License Guide

With a concurrent-user/Network License, you can install PHDwin on multiple computers. However, the number of users who can access PHDwin at the same time is limited to the number of concurrent licenses purchased. To set up the concurrent-user/network license, follow the steps below:

Step 1 – Download and Install the PHDwin License Server Application (License Manager)

  1. Download the latest version of the PHDwin License Server install from https://www.phdwindownload.com/phdwin-license-server/.
  2. This will be a zipped file – PHDwinLicSvr.zip.
  3. Unzip the file to get to the installation file – PHDwinLicSvr.msi.
  4. Make sure you are logged in with “Administrative” privileges – the install should only be executed under an administrative login.
  5. Close all other programs.
  6. Double-click on the PHDWinLicSvr.msi file to execute it – this will start the Installation Wizard.
  7. Read the first screen and comply with all recommendations and click Next. (If you must fix any issues, you can hit Cancel and just restart the installation wizard again when finished).
    • Note: If you do not see a “Welcome” screen but see options to “Modify, Repair or Remove” PHDwin License Server, it has already been installed. The program runs as an NT Service so you may not notice it is installed or running. If you are trying to update to a new version, it can only be installed after uninstalling the previous version.
  8. You must accept the license agreement to continue. After an authorized user has read the agreement, choose “I accept the license agreement” and click Next to continue.
  9. Next choose the installation location. The default location is C:\Program Files(x86)\PHDwin License Server–it is highly recommended that you do not change this location. Click Next to finish the installation.

Step 2 – Requesting a License for Concurrent-User/Network License

  1. To use PHDwin in a Concurrent-User/Network License Server, you will need to request a license by completing the following steps:
    1. Double-click the PHDwin License Server icon and click on the Registration button.
    2. Fill out the registration form completely – every field must be filled in to complete the request. Ensure that the System ID field has been populated before sending your request.
      • If the System ID field is not populated, click on the Delete button to regenerate an ID.
    3. Email your license request to the PHDwin license team by either:
      • Clicking the Request button, which will automatically generate an email with the necessary information pre-populated. All you need to do is send the email.
      • Manually emailing the information in the registration form to license@phdwin.com. You can take a screenshot of the completed registration form by pressing Ctrl + PrintScreen or typing in the information, including your name, company name, address, phone, email, and system ID. Ensure that the subject line of your email is “Network License Server Request for PHDwin Version 3”.
    4. After the licensing team receives your email, they will process it and send you two emails with a separate license file attached to each email.
    5. Follow the instructions below to save the license files.

Step 3 – Save Your Unlock Code Files

  1. After receiving two emails with unlock code files attached, you will need to save them as follows:
    1. Open the email from license@phdwin.com that contains the unlock code files.
    2. Save both unlock code files to the License Server installation folder. The default location is C:\Program Files(x86)\PHDWin License Server. Note: The files should be named PHDWin License Server.lic and PHDwin.lic. Please make sure to check the file names, as some email programs may append underscores to attachment names.

Step 4 – Starting License Server

Once you have received the unlock codes and saved them to the PHDwin License Server installation directory, you need to start the license server application by selecting Start. If the unlock codes are valid, the status of the License Server should say “Accepting License Requests”.If it says it is unable to open the main license file, try re-saving the files or contacting support. The first thing to check will be to make sure that no characters have been added to the name of the license files such as an underscore to the beginning of the file name. This is a common issue with text attachments being sent via Outlook. The file names are: PHDWin License Server.lic and PHDWin US.lic. The License Manager also has several features that can be helpful to users. The application indicates: Status & Licenses: how many unlock codes are available on the license. Current Network Users: how many network users are currently logged in (and which users they are). Checked-out Licenses: how many unlock codes have been checked out

Step 5 – Set Up Each User’s Machine to Connect to the License Server

  1. Once the PHDwin program is installed on each user’s computer, go to the default location where the PHDwin unlock code file (previously known as license file) is saved: C:/Program Files/TRC Consultants/PHDwin 3.1/Config. Delete the PHDwin.lic file if it exists.
  2. Open the PHDwin splash screen and click on the Registration button.
  3. Click on the Network License button and type the name of the server next to “Host”.
  4. Click “Apply” to save the changes and go back to the Registration window.
  5. Click “Close” in the Registration window.
  6. Restart PHDwin. When running PHDwin, the computer will then look to the server to see if there is an unlock code available to open the program.